
5 steps to getting the best out of physical computing in primary school
I’ve seen a lot of requests for help recently when it comes to teaching physical computing in KS2 using crumble and other micro controllers, so I thought I’d share my experiences on what works and how I’ve managed to get some fantastic projects from my year 5 and 6’s.
First off, it is mandatory that we teach physical systems within computing, or at least simulate them:-
Pupils should be taught to:
design, write and debug programs that accomplish specific goals, including controlling or simulating physical systems; solve problems by decomposing them into smaller parts
UK National Curriculum – Computing in Key Stage 2 – 2013
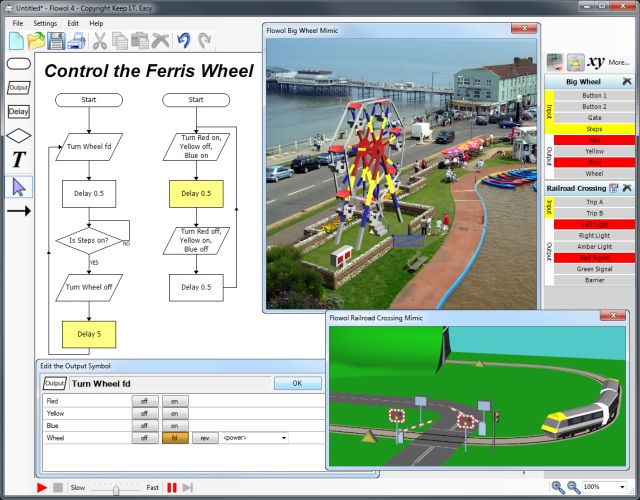
I’ve not seen too many examples of software that directly simulates physical systems; although there are some out there such as Flowol – software that allows direct mapping of algorithms as code to control and animate a simluation or ‘mimic’.
However, nothing can compare to pupils actually connecting power and control to physical components and seeing the movement, light or sensory interaction with the physical world. The learning and engagement is far superior, just as it would be if pupils were learning how to cartwheel rather than just looking at videos of someone doing one on a screen.
I highly recommend, if you are teaching or leading year 5 or 6, that your school purchase some kind of physical computing systems. These range from well known brand names like Lego Wedo and Lego Mindstorms, to the highly popular BBC Micro:bit and more independent, yet incredibly versatile controllers such as Redfern’s Crumble.
I do not have any affiliation with, nor do I receive any commission from any of these products and to date, my only real teaching experience is with Crumbles because that is simply what my schools invested in. However, I will attempt to give you an approach to physical computing which should encompass all different types of systems.
Step 1 – Know your kit
By knowing your kit, I don’t mean you need to be an expert in physical computing, coding, wiring etc. More that you’ve had a go yourself and can put together a working system. For me, it was the wiring that I had to get my head round. On a Crumble for example, the four connections at the bottom of the controller board are specifically for motors and there for also deliver power. The top two on the left receive the power and on the right deliver the power, so you can daisy chain components together, and the ABCD connections deliver the control (on, off, colour, inputs, outputs etc).
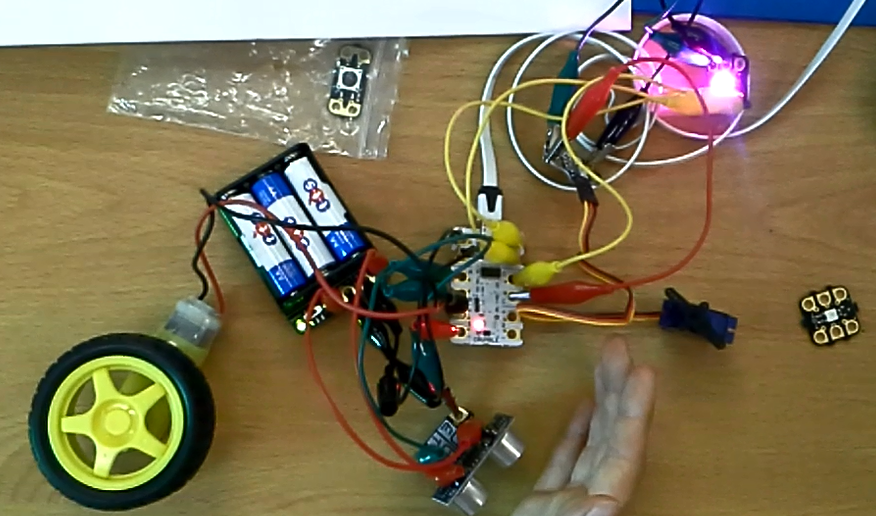
So have a play, make a working circuit (like the one in the video above), find out what the misconceptions are, think about making a wiring diagram (like the examples below) so you can help pupils as they use the kits for the first time.
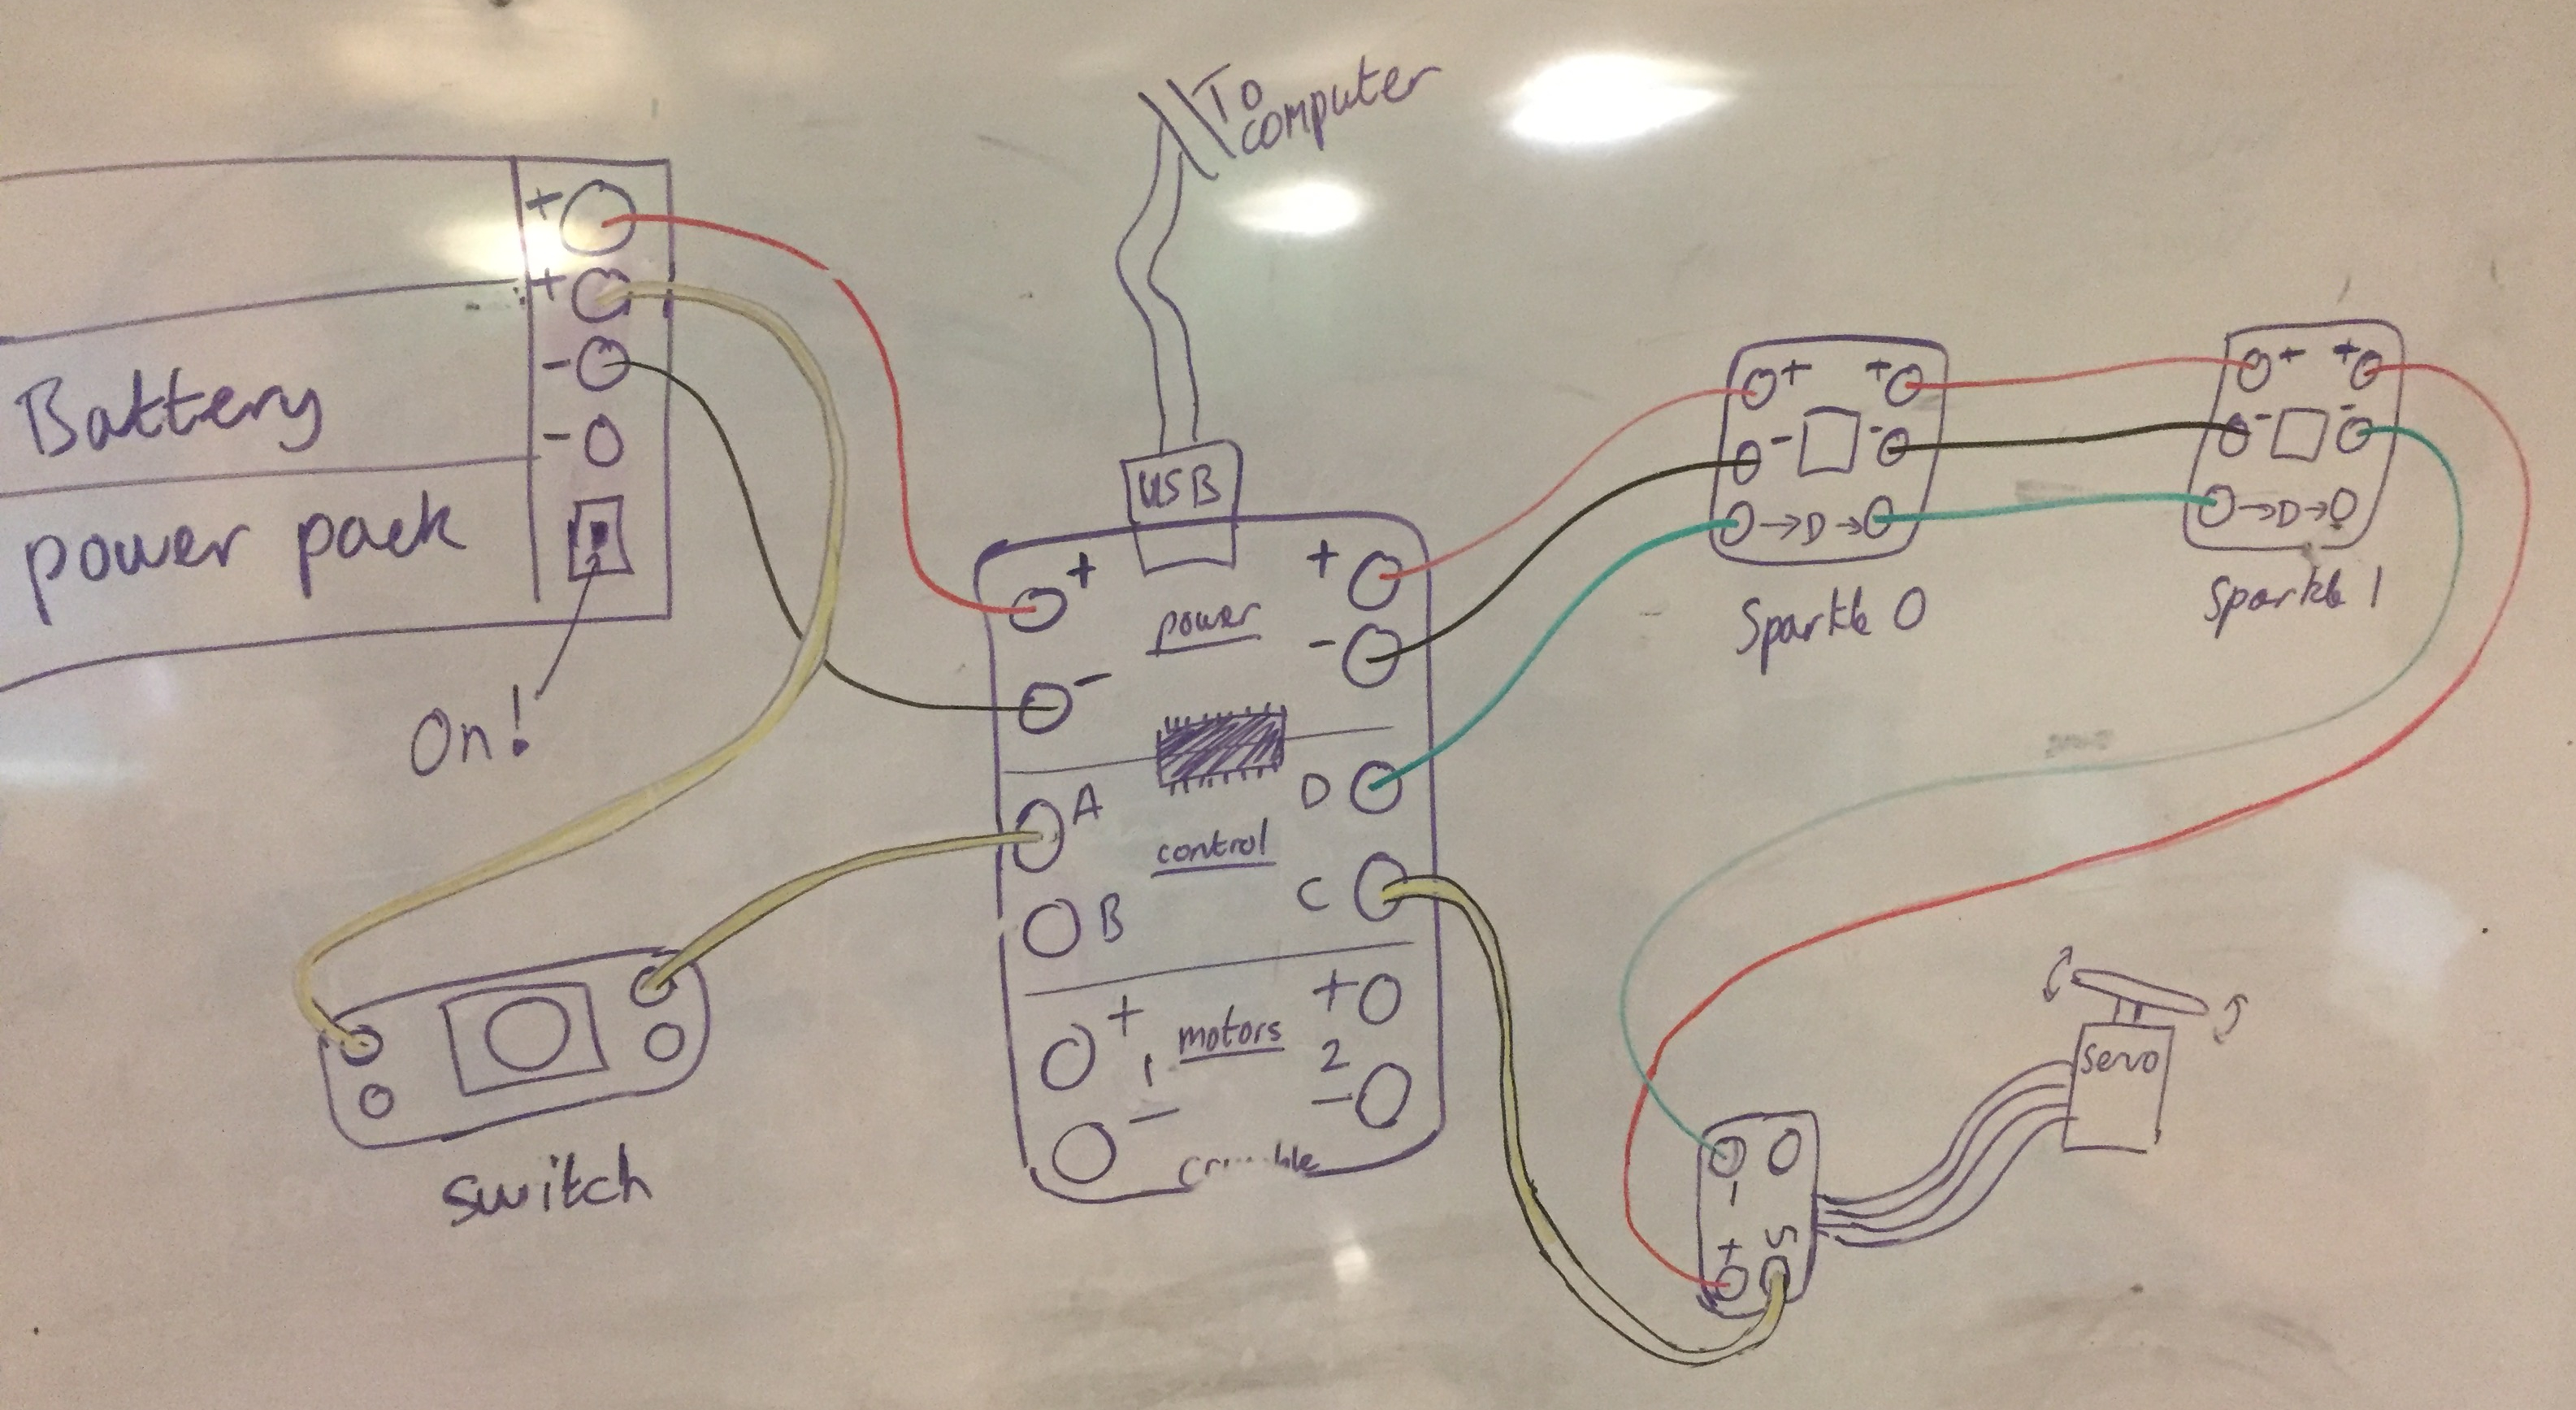

Obviously these diagrams will change depending on which components you have and which ones you are teaching about in each particular session. You could get the children to create their own wiring diagrams after a guided session, where you are teaching about the flow of electricity, positive & negative and control.
Notice in the above diagrams I’ve used black wires for negative, red for positive and green/ yellow for control. It obviously doesn’t matter physically which colour wire you use for any connection, but I find it’s good practice (if you have enough of each colour!) to use this colour arrangement, as it is easier to ‘de-bug’ any issues and also prepare them for industry, where colour is extremely important!
Step 2 – Step in! (But one step at a time…)
As I said before, don’t wait until you think you’re an expert; just get started! Take it slow and give the children one component at a time. Pause regularly for discussion on how and why each component needs power AND control, what the difference is, and look at the sections of code needed each time.
This is how I set my classroom and initial lessons up:
- Either with one laptop between two, or in the ICT suite, working in pairs.
- Each pair has a crumble kit (I use plastic food containers from the pound shop, they seem to fit everything in!), with all components in it.
- Introduce the crumble controller (white circuit board), how it plugs into the computer via USB, and get children to load up the crumble software. If controller is connected and working, it will say so in the software.
- Power: find battery pack, I always get children to fit batteries themselves to practise getting them the right way round. Wire up the battery to the controller, showing them the only places where the battery should be connected (top left) using red and black wires, ensuring negative goes to negative and positive to positive. Discuss the importance of this, could do this in connection with electricity unit in science. Show them there is an on switch on battery and that the light turns red when there is a short circuit.
- Pick a component (I always start with Sparkles) and ask children to study it closely, looking for signs and symbols. Maybe make them guess what it is before you reveal it’s an LED.
- Identify positive and negative symbols on sparkle and on controller, wire them up using black and red wires.
- Then discuss control; now that the LED is powered, how do we send signals to it? Discuss using a different colour wire, and that port D is always for controlling sparkles.
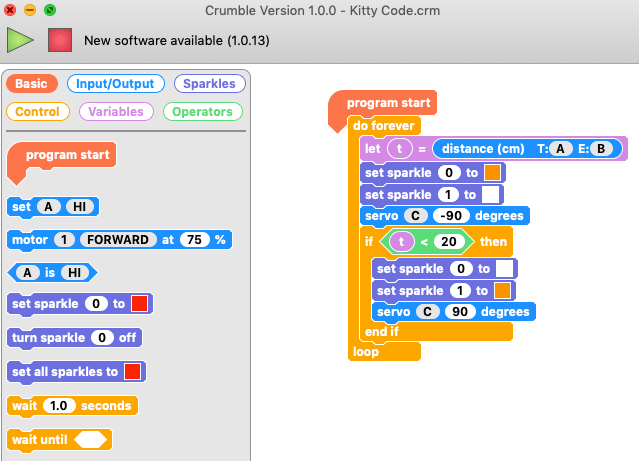
- Once wired up, use the crumble software to activate the sparkle (note: the first sparkle in the chain is always numbered 0, the second is 1 etc)
- Get children to loop either a flashing or colour changing LED. Once the loop is running, ask them to disconnect the USB cable from the computer. The sparkle continues to change, because the program has been loaded and stored in the controller.
- Repeat this process for all the different types of components you have (servos, motors, switches, sensors etc). When running 40 min lessons, I found I could teach one, maybe 2 components per lesson, making sure everything is discussed and reasoned, and at the end of each session everything is packed away properly.
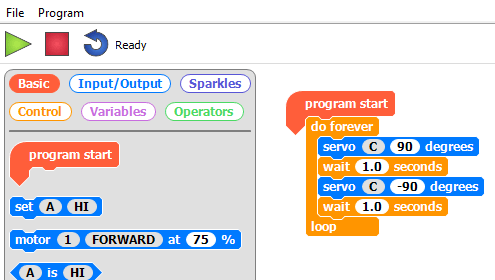
- I got the children to save their code, so they can refer to it later when building their project. You can print screenshots out for them if they have computing folders/ books, as shown below.
- NOTE: When coding servos, they will not move unless there is a ‘wait’ block after the movement, pausing for enough time for the servo to perform that movement.
Step 3 – Design!
Now that the children have had experience in wiring and coding all of the crumble components, it’s time to get creative. This is where my philosophy might differ from other schools of thought…
I am an advocate of freedom in art, rather than a craft set by the teacher. If the whole class is making a similar project, prescribed and limited by the teacher’s subject knowledge or confidence, then I think the children miss out on possibly their only opportunity to really explore physical computing in primary school. Unless you have enough kits or time to run physical computing in other year groups, then you can’t afford to get them all making something mediocre. In your average 3 form entry school, with one class set of crumbles, I would allocate the kits to each class for a whole term, and go all out!
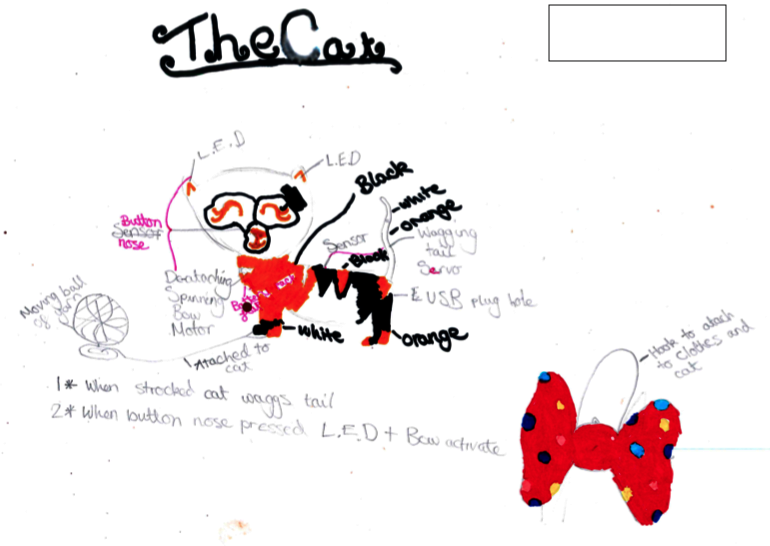
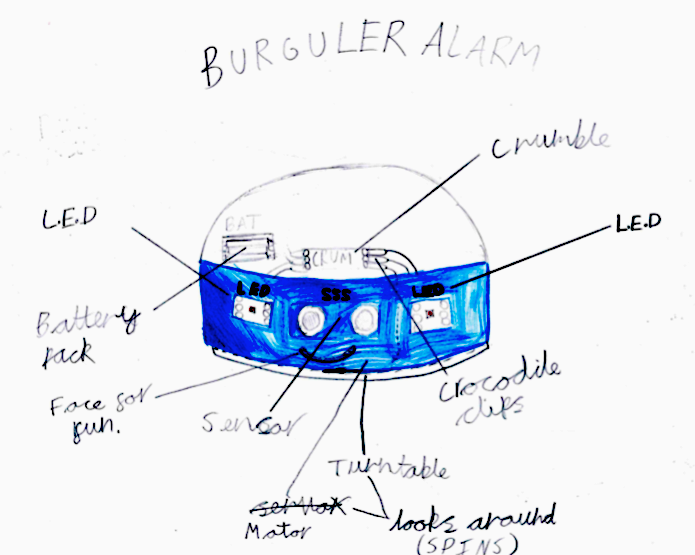
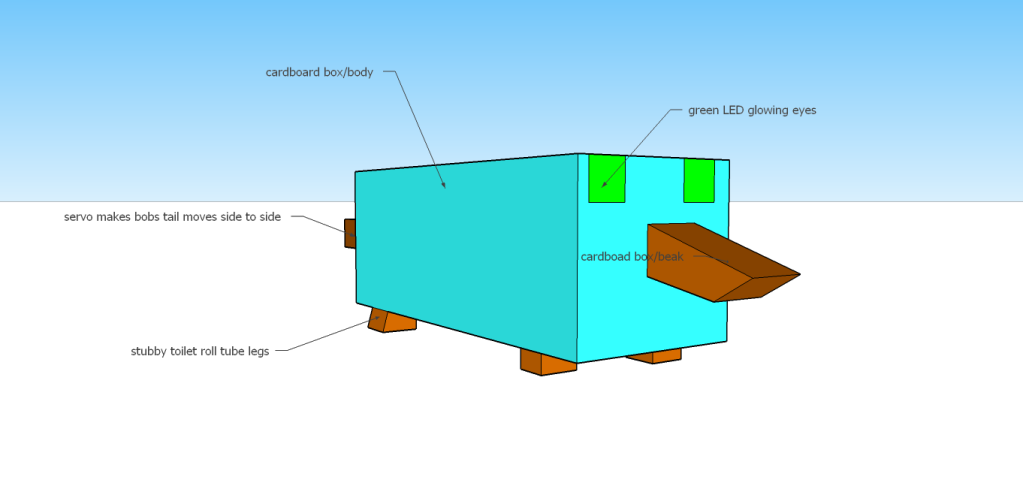
Therefore, I would open the brief right up and ask the children; ‘now that you’ve seen what the crumbles can do, what can you build?’ Allow plenty of time for discussion and ideas before committing to a design. I have used large A3 sheets of paper for children to freehand designs on and also 3D CAD software such as Sketchup (see screenshots below).
Most of the time I’d offer a choice of how children wanted to complete their designs, however it is essential that they do complete a design, for the following reasons:
- It keeps them accountable; obviously they can alter their plans if they’ve designed something too hard to build, or realise they need to change the position of something, but ultimately they have a clear end goal and you can see if they are putting in enough effort to complete it.
- They can refer back to it, scaffolding their own learning rather than them trying to wing it or argue with their partner about how it is to be done.
- I’ve found that spending time on the design stage really helps to engage girls. They want their designs to look good and therefore are invested in the project from the beginning.
- They can mark on their plans which elements they are confident with, and which areas you may need to spend some more time teaching on.
- It can generate a resource list that you can ask them to collect and bring to school (if you don’t have a fully stocked DT cupboard!).
Step 4 – Can we build it? Yes we can!
I would recommend they wire up their circuit and test it first, making sure it works and does what they want it to. That way, they can build around the circuit, making sure that it’s not a case of squashing in the components, controller and power pack in after the model is finished (which, trust me, doesn’t work!).
Think of ways you can scaffold the learning in some areas, while challenging them in others. I usually give them the wiring diagram that we all created together in the exploring lessons, and make sure they have access to their coding screenshots. Then they can really focus on the building and assembling of their creations.

Step 5 – Celebrate and Evaluate
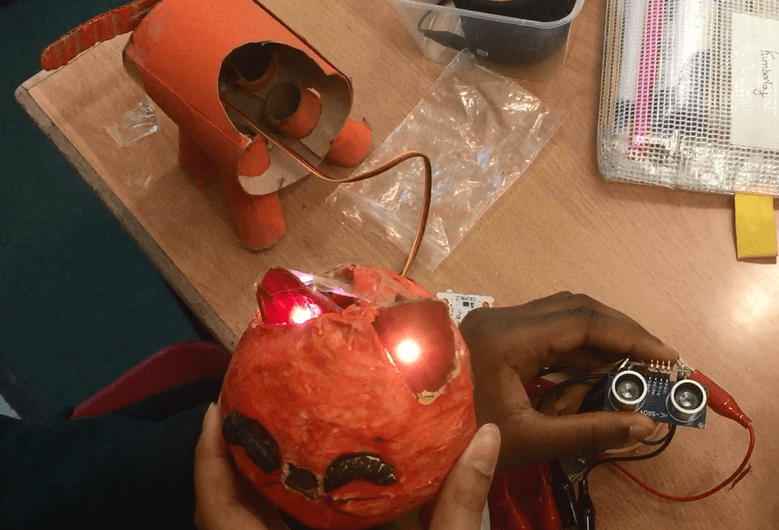
These magnificent autonomous creations are usually some of the best things pupils have ever created (at least from the point of view of adults!). Parents, SLT and teachers will marvel at the culmination of wiring, coding and building all done by children to produce these moving interactive robots. They are a must for parent’s evening showpieces, blog posts and all other manner of school promotional tools; all because our generation can’t quite believe that children have this kind of access and this kind of capacity for highly customisable programmable robotics.
Not only can the children evaluate as they would at the end of a normal DT project, but save the designs and models for next year’s cohort; to inspire and motivate. Most of all, share your amazing creations with other teachers; show them that it’s not that hard to teach and that every child deserves a chance to explore their innovative and inventive self!
I’d love to hear from you if you found this post helpful, especially if you have any physical computing creations you’d like to share or show off! I’ll leave you with some of my pupils’ creations…

Thank you so much for taking the time to share this! I really appreciate how you have included your methodology too. I’m a High School teacher (DT) but have a fair amount of Primary classes on my timetable for this year. I’m looking forward to using these kits to run projects in the new year. Thanks again.
LikeLike
You’re more than welcome! I’d love to know how you get on!
LikeLike
Hi, thanks for sharing this, it’s been really useful to read through as I’m planning to use our Crumble kits for the first time with year 5 next term.
At the moment we have starter kits, and also wheels and motors. I noticed the projects that you showcased make a lot of use of distance sensors and servos – I’m wondering whether I need to purchase these or could do a similar series of lessons just with the equipment that comes in the starter kit (2 sparkles, light sensor, buzzer, switch, plus the motors we bought). I love the idea of just letting them loose to design whatever they like!
LikeLike
Thanks Rachel, you don’t need those extra bits like the distance sensors and servos, but it certainly gives the pupils more scope and room for imaginative creativity! The more inputs and outputs, the better!!
LikeLike